
Make a Video From Just a Title — AutoFlowCut Story Mode
A single title is enough
📌 The screens in this post are UI mockups built from a real project's data and the app's own CSS. The values in them (scenes, segments, prompts) are the actual output. The project itself ran in Korean; the story text shown here is an English translation of that output — the numbers, timings, and prompts are unchanged.
Making one video usually takes all of this — a topic, a script, scene splitting, a voice cast, sound effects, image prompts. Story mode fills every one of them in for you, starting from a single title.
AutoFlowCut's Story mode is a pipeline that turns one idea into a scene table with prompts, voices, and sound effects attached. Give it a title and it runs synopsis → script → scene split → audio → prompts in order, passing each step's output straight into the next. Research is optional — you open and run it yourself, then tick [use research context] in Synopsis for it to count. You never leave AutoFlowCut.

The values in the screens below are the output of a real project, "The Rich Man and the Poor Man." It started from one title and produced 11 scenes, 20 segments, 72.5 seconds.
The pipeline at a glance
A stepper sits at the top of the Story screen. Each step is a chip, and a colored dot shows its state — idle, running, done, error.
0 Setup → 1 Research → 2 Synopsis → 3 Script → 4 Scene split → 5 Audio → 6 Prompts
| Step | What it hands to the next step |
|---|---|
| 0 Setup | Story type, generation AI, output language, script length, scene-split unit, title |
| 1 Research | Structure analysis of reference YouTube videos, plus fact-checked claims |
| 2 Synopsis | The storyline and a finalized cast |
| 3 Script | The finished script |
| 4 Scene split | Scenes, per-speaker segments (with emotion), sound-effect cues |
| 5 Audio | Per-speaker narration tracks and generated sound effects |
| 6 Prompts | One image and video prompt per scene |
Getting started: the Setup tab
This is the pipeline's entry point. Everything you pick here is saved to the project, so it restores exactly when you reopen it later.
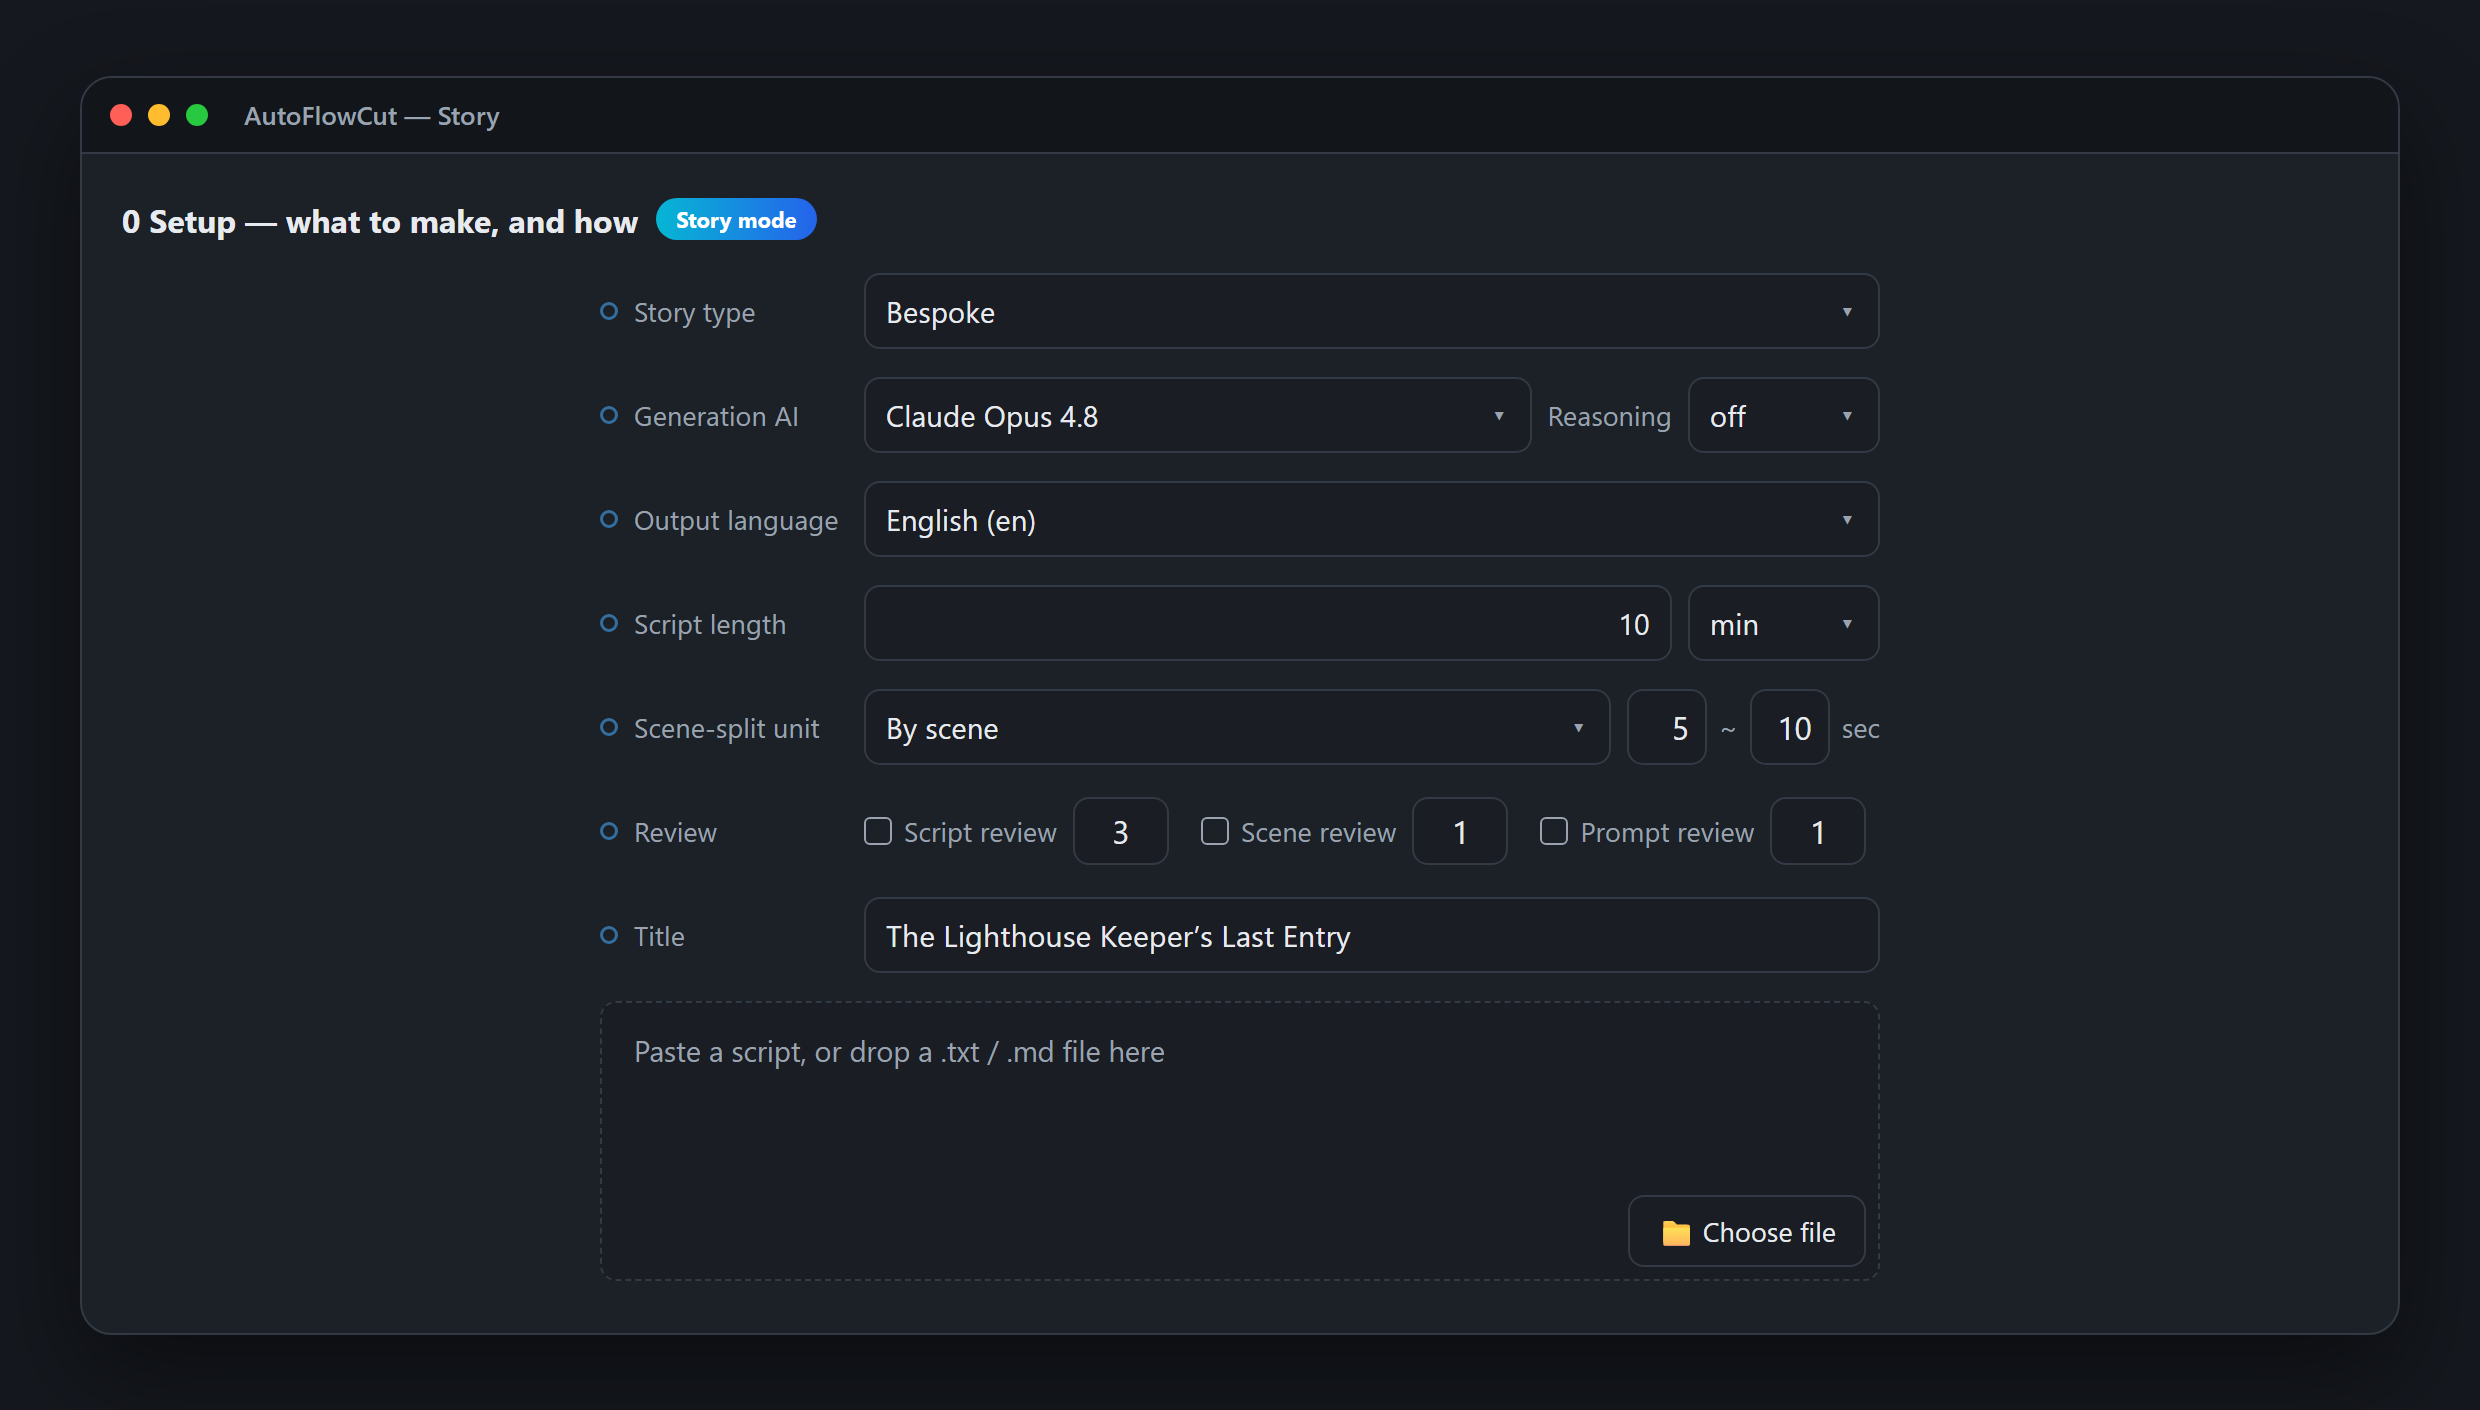
- Story type — the available genres depend on the output language. Korean offers yadam, English offers dark history, and both languages offer the universal default, bespoke.
- Generation AI — the model that writes your script (Claude or Codex). If the model supports it, a reasoning-level picker appears next to it.
- Output language — Korean or English. This is the language of the story, not the app UI.
- Script length / scene-split unit / title — the rest is up to you.
Fill in just the title and leave the script empty, and Story mode writes the script for you too. (Already have a script? See how to paste your own script.)
All the way through: Run all
The Scene-split, Audio, and Prompts steps each have an [auto] toggle. Turn on auto for the steps you trust, press ▶ Run all, and the pipeline carries itself to the end.
Script has no auto toggle — it's the step that needs your title and settings, so Run all only becomes available once the script is done.
💡 Research and Synopsis are gate tabs, not run steps. They activate only when they apply to your project and stay grayed out otherwise. The first time, we recommend stopping once at the Script step to review the result, then letting the rest run automatically.
3 Script — the title becomes prose
The first thing the pipeline hands back is the script itself. This screen is an editor, not a read-only preview, so you can fix any line you don't like right where it is.
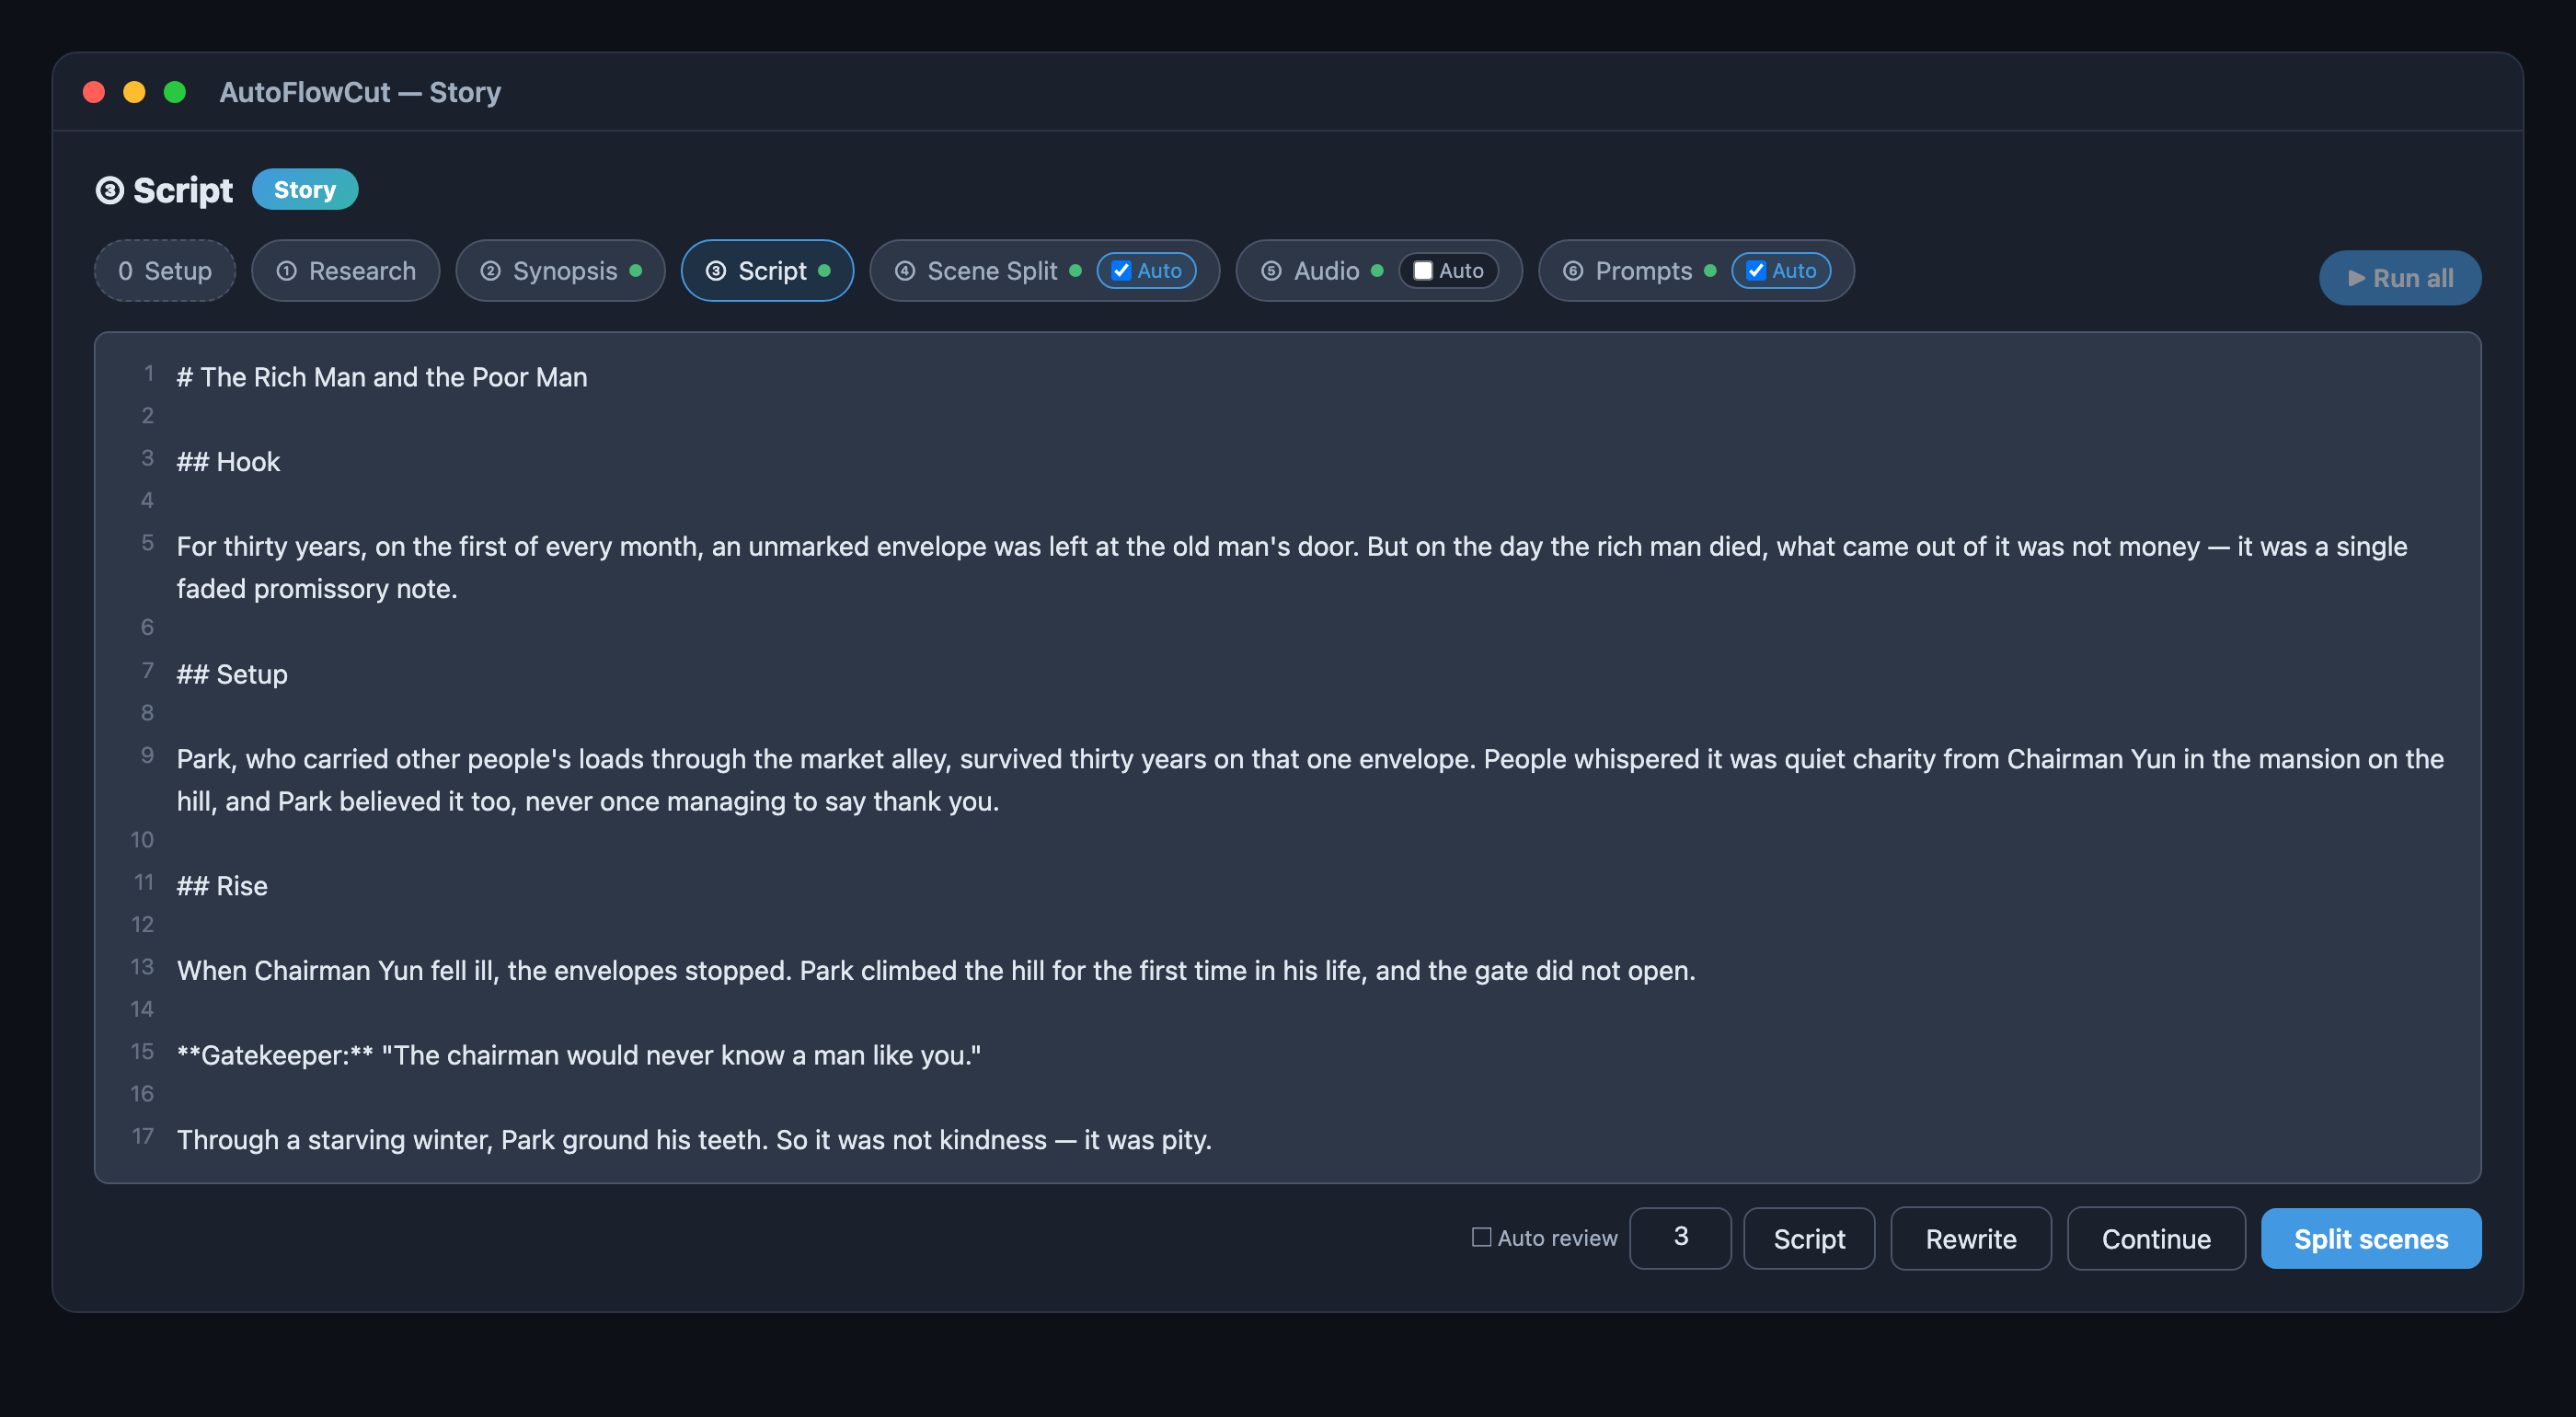
- Rewrite — start over from scratch with the same title and settings.
- Continue — keep the current text and write onward from it. Use this when the script came up short.
- Split scenes — lock this script in and hand it to step 4.
Lines written with a speaker prefix, like Gatekeeper:, are recognized as dialogue. That marking is what becomes per-speaker segments and voice assignments downstream, so it's worth prefixing your dialogue.
4 Scene split — the script becomes a table
The script is cut into scenes, and each scene into segments. Rows are segments, not scenes, so a scene with several segments repeats its number in the # column.
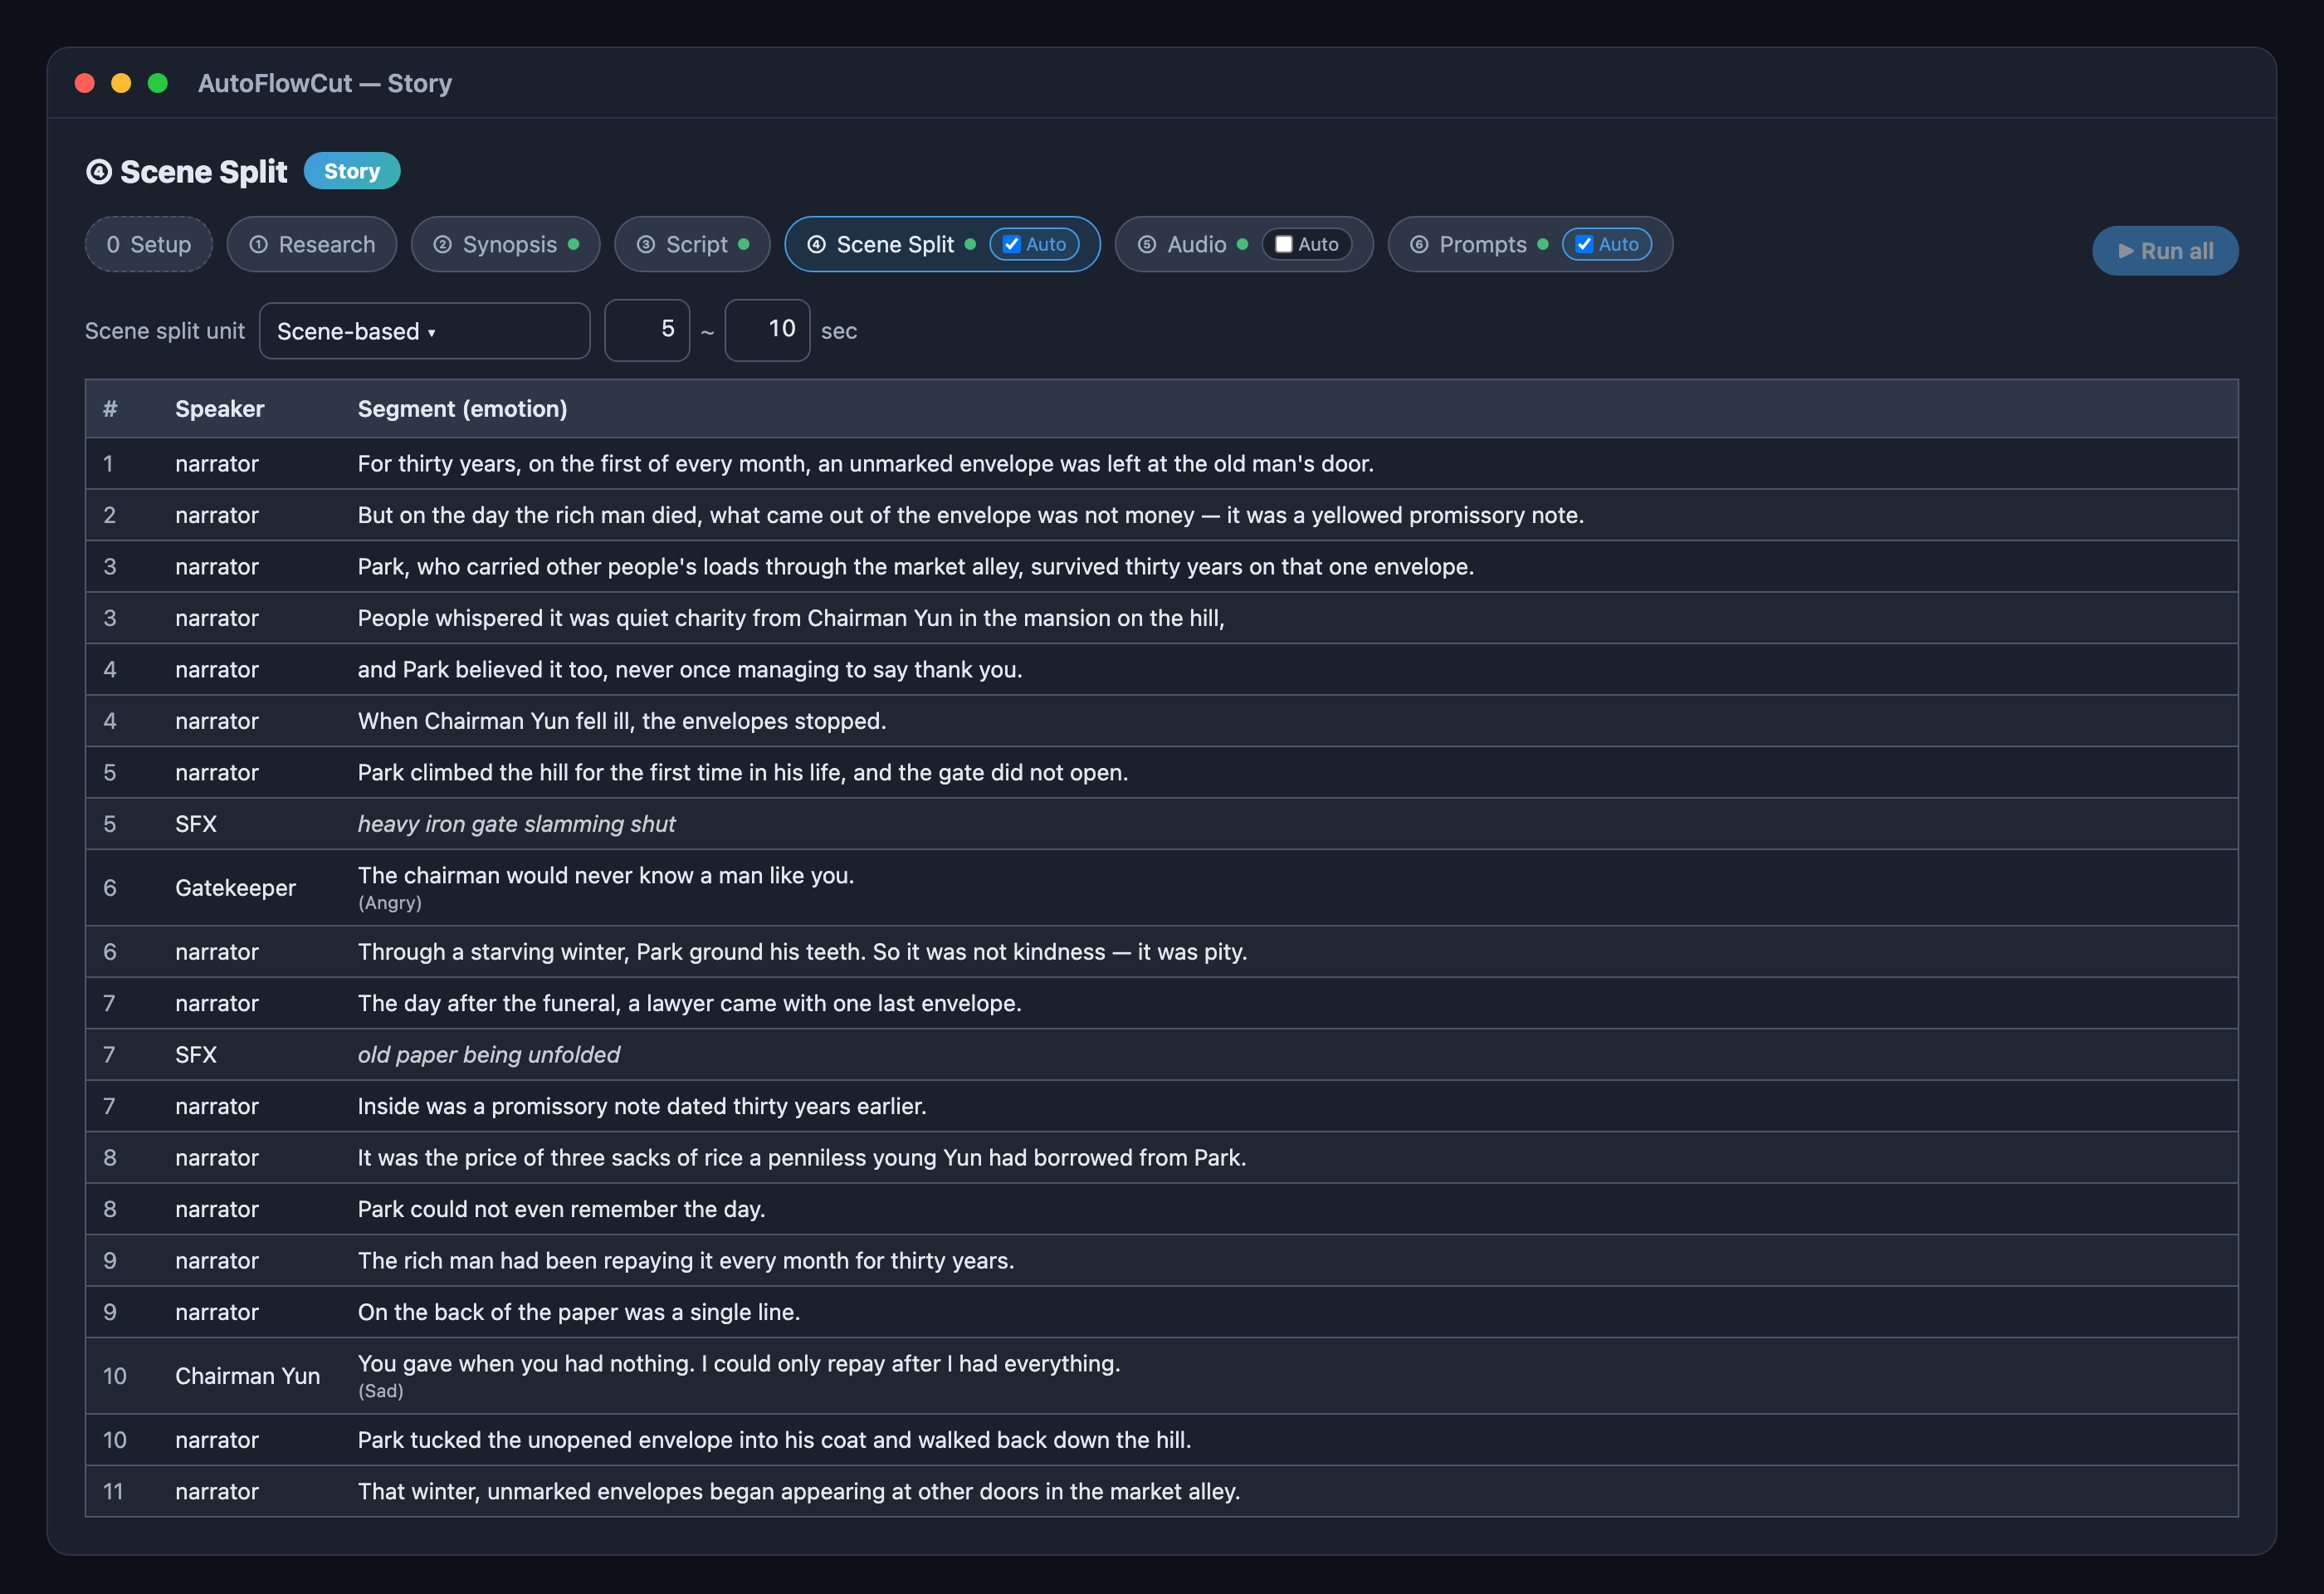
What to look at in the table:
- Speaker — whatever the script named:
narrator,Gatekeeper,Chairman Yun. - Emotion — the table shows an emotion only on non-narrator dialogue (
(Angry),(Sad)). Narration has an emotion value too, but it isn't displayed and is always synthesized asnormal— only dialogue emotion reaches the TTS in step 5. - SFX rows — sound-effect cues arrive as their own tinted rows. They come out as English descriptions like
heavy iron gate slamming shutbecause the sound-effect model takes English. - Scene split unit — change
Scene-based/Sentence-basedand the min–max seconds in the bar above, then split again. The example project uses scene-based, 5–10 seconds.
5 Audio — a voice per speaker
A speaker list appears above the table. Pick a different voice for each one, and generate just that speaker's lines first if you want to hear them before committing.
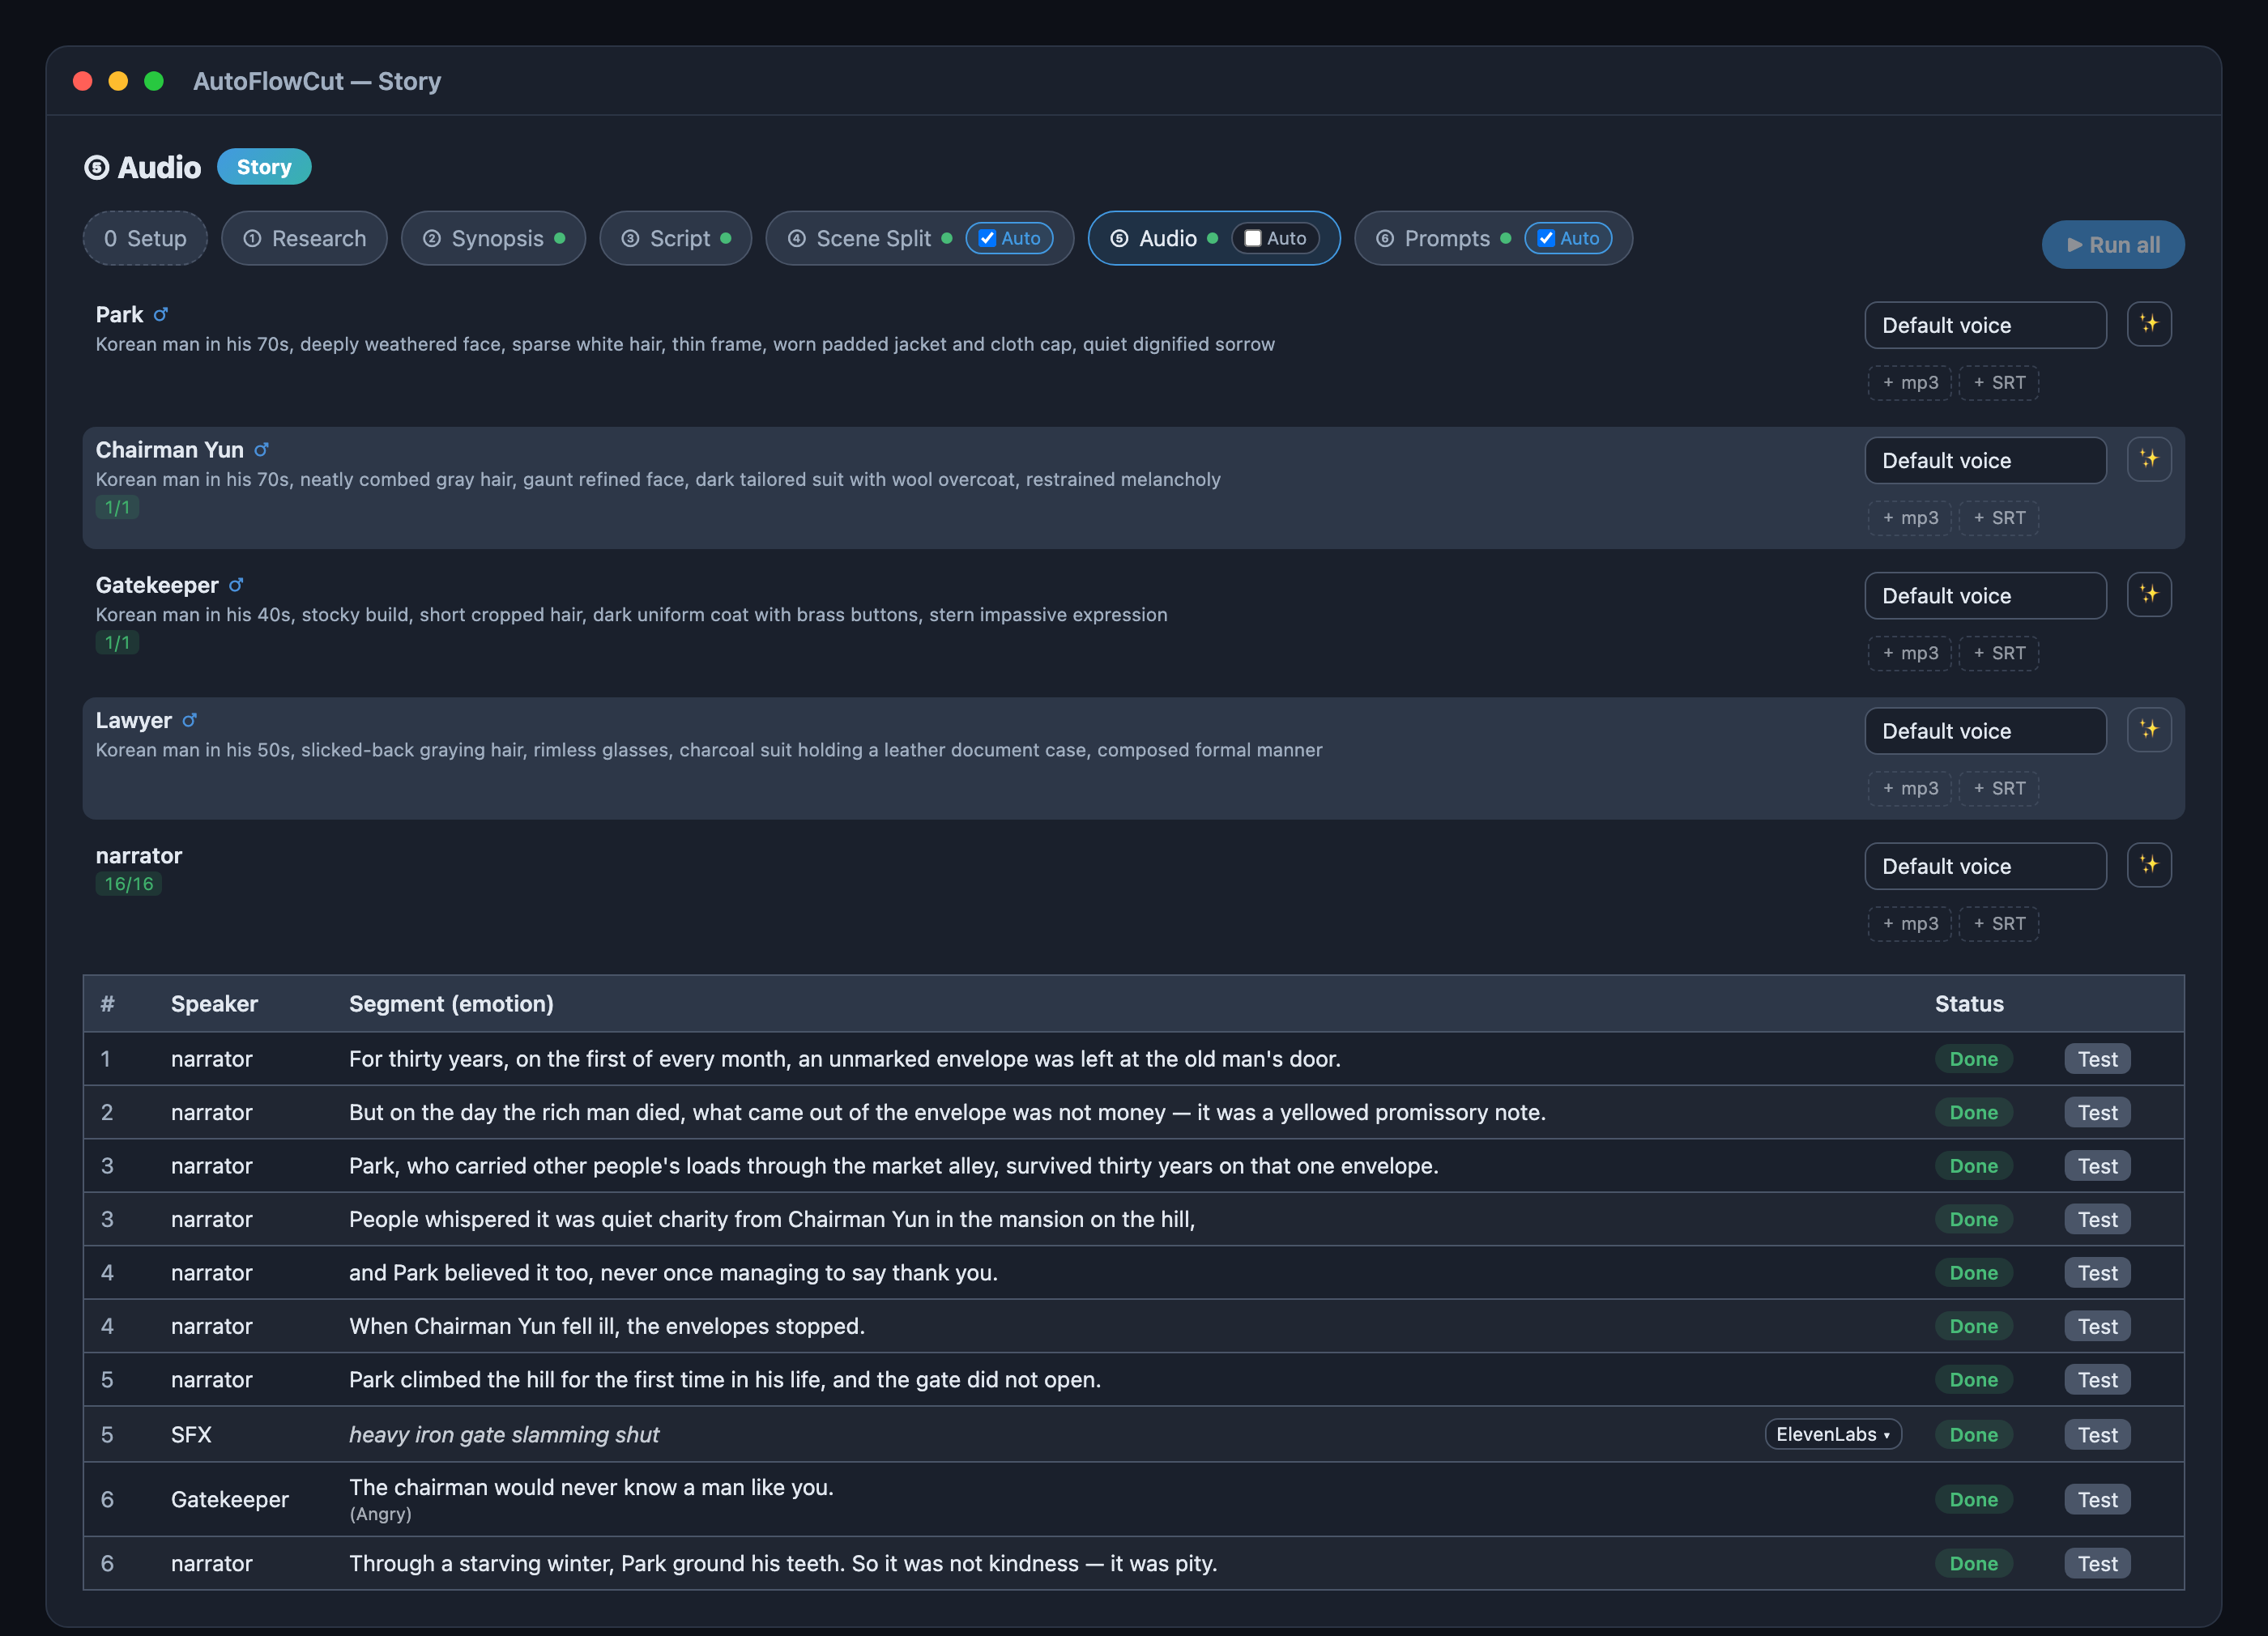
- Voice picker — browse Typecast, Gemini, and ElevenLabs voices in one window. Each speaker's gender and appearance sit under the name, so casting to the role is easy.
- Per-speaker progress — a counter like
16/16shows how many of that speaker's segments are done. - Segment status — every row carries an idle / running / done badge, and a Test button regenerates just that one line.
- Sound-effect source — SFX rows let you pick the generation source. ElevenLabs is the one that works today; the library option is a placeholder that isn't wired up yet.
- Your own recordings work too — drop an mp3 and an SRT onto a speaker row and that file is used instead of TTS.
6 Prompts — an image and video prompt per scene
The last run step. Each scene gets one image prompt and one video prompt.
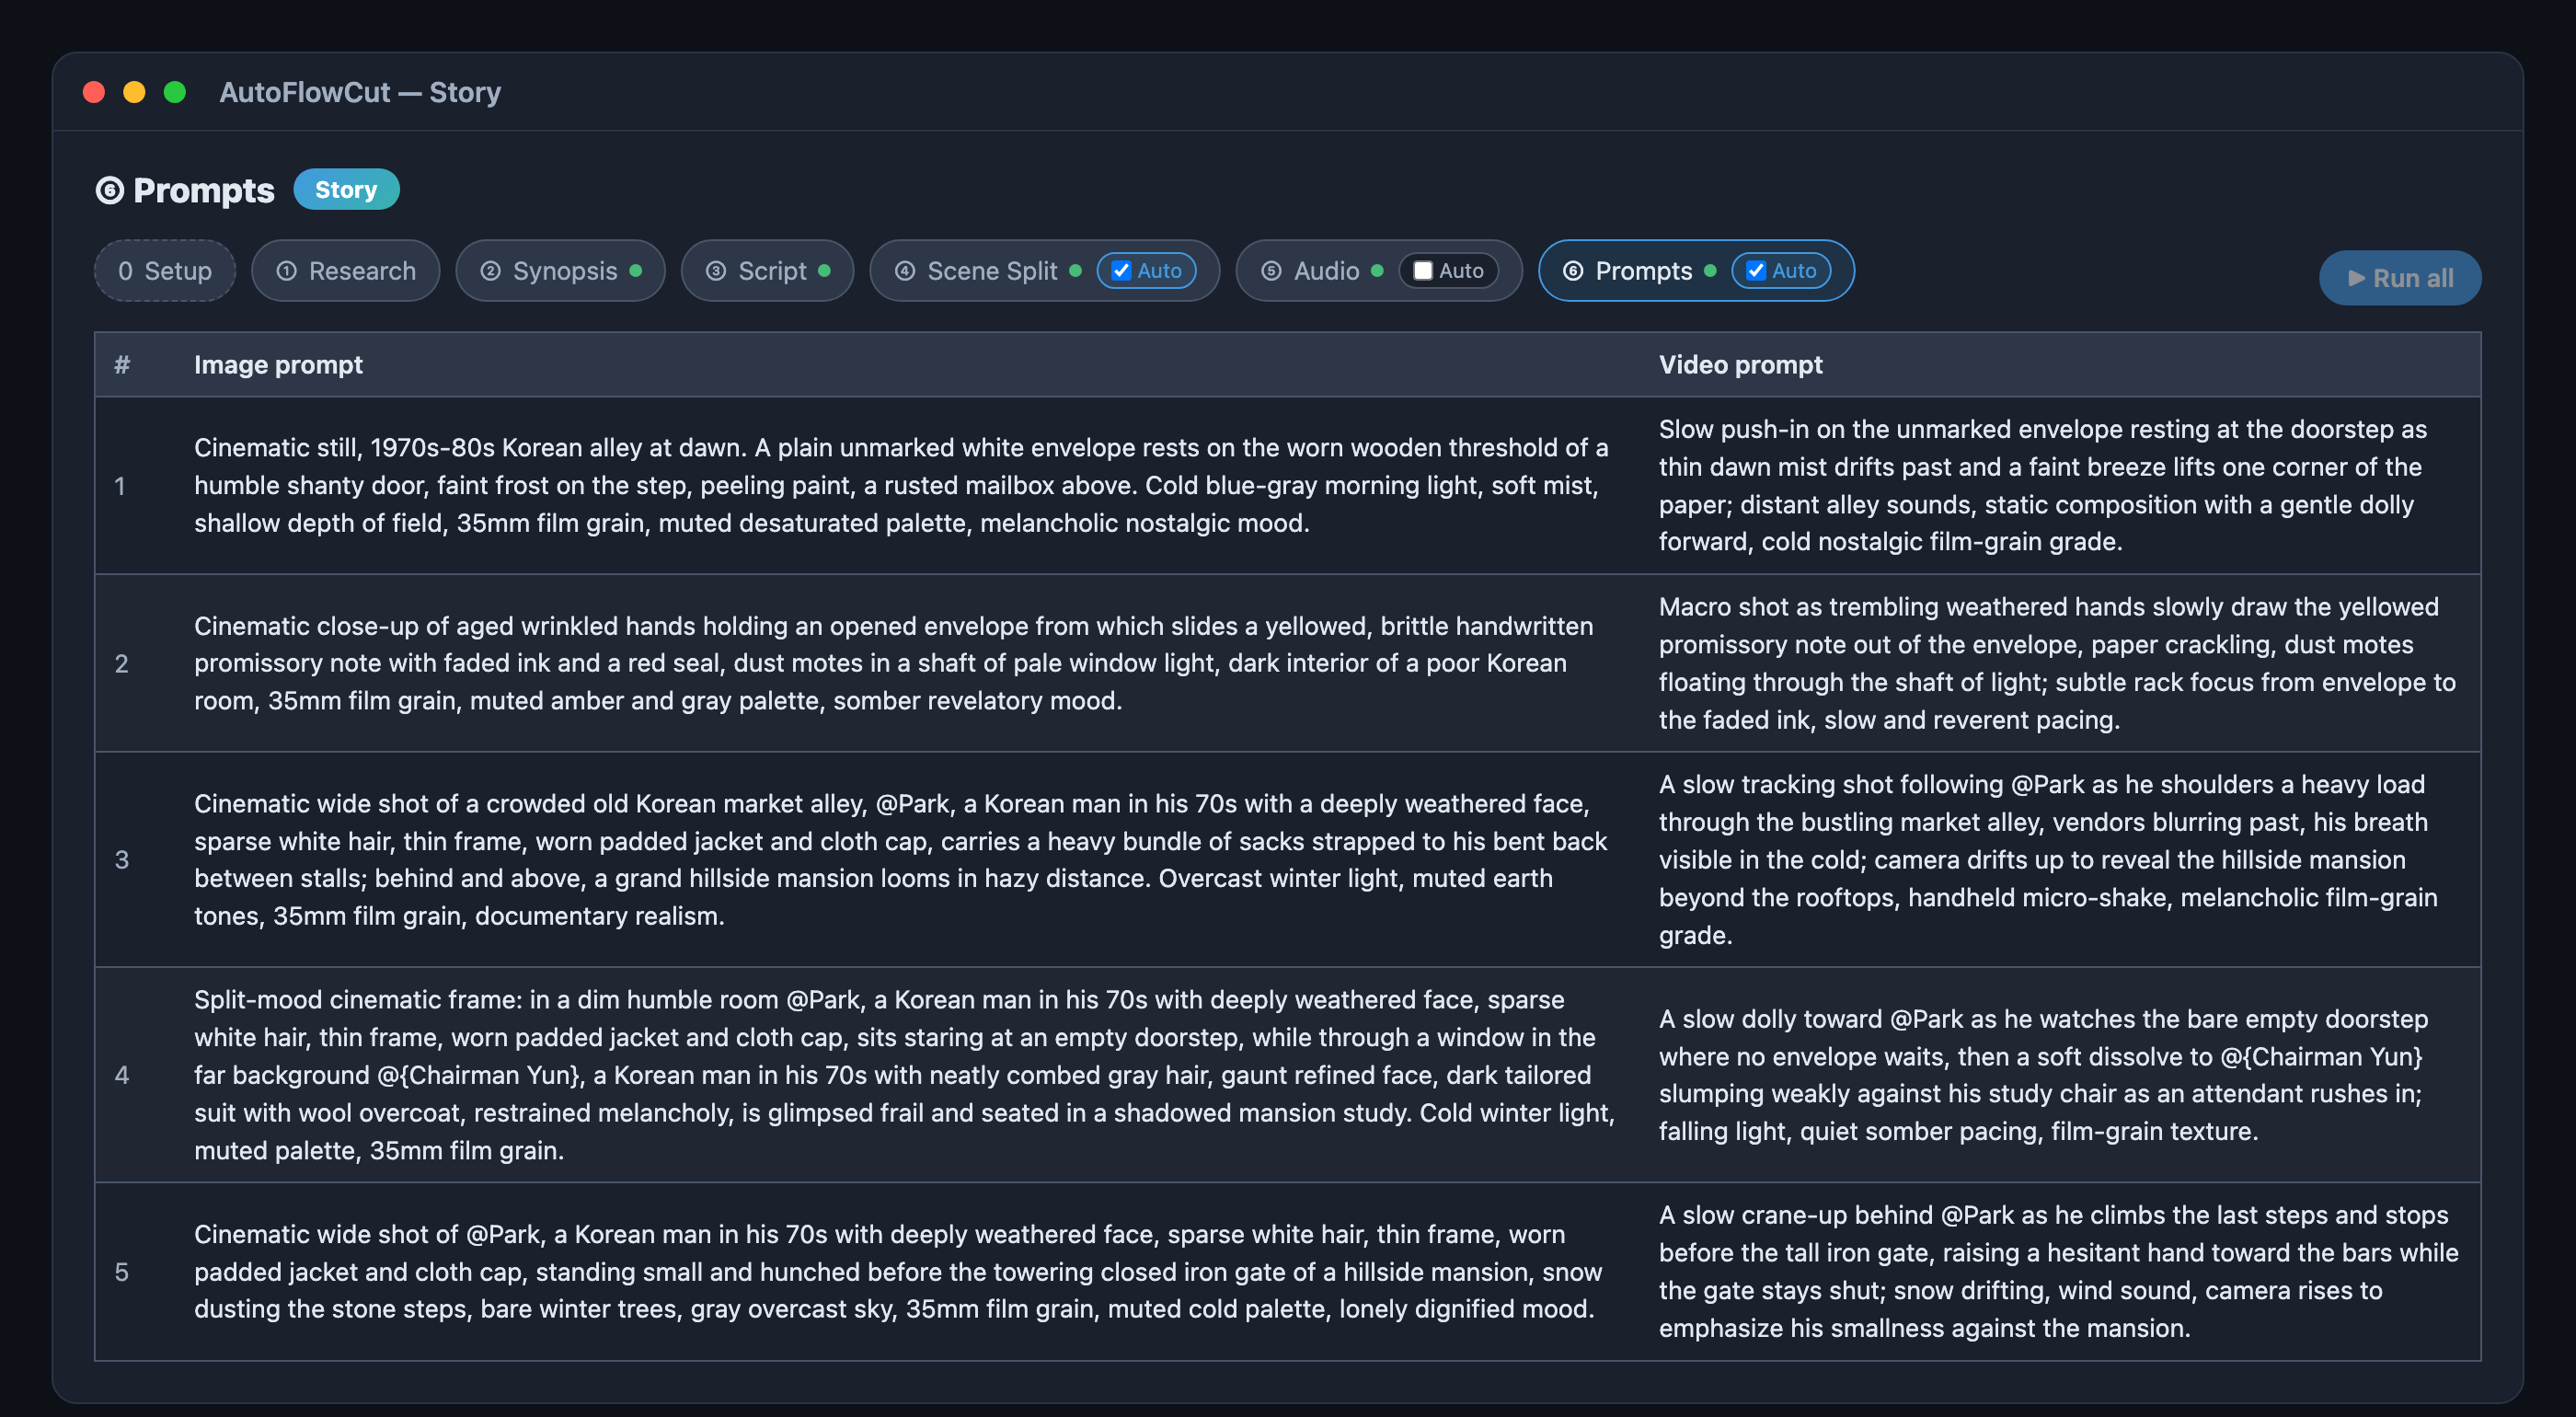
The thing to notice is the @Park-style mentions inside the prompts. Characters from your script register themselves as reference cards, and scenes featuring them get the mention inserted automatically. The card carries the character description pulled from your script as its prompt, and its image slot starts empty. Generate the reference image once and it gets attached to every scene that mentions that character from then on — which is what keeps the same face across 200+ scenes.
You can also type @ in a prompt to add or remove a character yourself. Names containing a space are wrapped in braces, like @{Chairman Yun}.
Generate and export
Once the prompts are ready, the rest is the usual AutoFlowCut flow:
- Batch-generate images per scene, and T2V/I2V videos where you want motion.
- Audio tracks (narration and sound effects) are already placed on the scenes.
- Export to CapCut, Adobe Premiere, or Vrew in one click — timeline, subtitles, and Ken Burns animations included.
In short
One title → a few settings → Run all → export. Decide what to make, and Story mode fills in how to make it.
Curious how "The Rich Man and the Poor Man" came out end to end? Read From one title to 11 scenes — a real run. To source topics well from the start, read how to benchmark high-view YouTube videos; for a step-by-step reference, see the Story mode guide.